Friday, August 17, 2012

Make a Jelly Roll into a Yule Log

For Christmas I buy a Chocolate Jelly Roll (or you can make your own), and make it into a yummy Yule Log!  You can decorate it with white frosting and sprinkle with cocoa powder or below is what you need to make it look like the picture above; a 2-toned bark looking log, with powdered sugar as the snow:

You'll Need:
  • 1 large jelly roll any flavor (a jelly roll is a rolled sheet cake with different flavored fillings such as chocolate ganache or fruit jelly; and it's not frosted on the outside)
  • 2 milk chocolate frosting cans
  • 1 dark chocolate frosting can
  • mini marshmallows
  • Hershey's chocolate kisses, unwrapped.
  • toothpicks
  • powdered sugar
To Decorate:
  1. Take large jelly roll and cut at an angle, 1/3 of the end of the roll. Place larger piece onto serving platter. Take the small 1/3 piece and with frosting, stick the angled-cut end to the side of the larger jelly roll piece; this is the stump. Stick it to the middle side or upper/lower side of the cake, either way you decide what looks the best.
  2. With a spatula or butter knife, decorate all the jelly roll sides and ends with the milk chocolate, then take the dark chocolate and put a few 2-inch width stripes on the top and sides but not the ends of the 'log' and 'stump'. 
  3. Using a fork, rake lines of 'bark' grooves along the log and stump. To make 'bark knots' trace the fork in an 'eye' shape along the milk and dark chocolate areas. For the ends of the log and stump, place the fork in the center and make a circle bulls-eye design in the frosting.
  4. Make the mushrooms by sticking a mini marshmallow onto a toothpick. Push the tooth pick all the way through the marshmallow so the pointed end is exposed to stick into the chocolate kiss. Stick the bottom of the unwrapped chocolate kiss on top of the skewered marshmallow. Use the exposed end of the toothpick to insert 'mushrooms' into cake. Make a grouping of 'mushrooms' in one area like 3 on the log and 2 in the stump; again use your own judgement of what looks good to you.
  5. Last, use a powdered sugar dispenser or place desired amount of powdered sugar in a sifting screen and sprinkle the sweet 'falling snow' over the top of your Yule Log! 
  6. To serve; slice horizontally and eat with ice cream or on its own.       
                                       Merry Christmas!!    


Monday, August 13, 2012

Crockpot-Smothered Beef and Green Chilie Burritos


Ingredients:
1 teaspoon salt
1/4 teaspoon garlic powder
1/4 teaspoon onion powder
2 teaspoons chili powder
1 teaspoon ground cumin
1/4 teaspoon cayenne pepper
2 1/2 pounds beef stew meat, cubed (top sirloin).
Extra virgin olive oil
2-4 oz. cans of mild diced green chilies.
1 large whole onion, peeled (don't cut up the onion; its easier to "fish" out of the crock pot whole).
2 garlic cloves, peeled.
2-19 oz. cans of mild enchilada sauce.
Large can refried beans
10 to 20 Ready to cook large tortilla dough rounds (Tortillaland or other brand).
Shredded mexican cheese mix or shredded Monterrey jack cheese.
Large Crock Pot (slow cooker)
Cuisinart or Blender

Directions:
  • Mix together the 6 dry seasonings in a bowl and set aside.
  • Pat dry the beef cubes with a paper towel (moisture on meat prevents browning).
  • Season the beef on both sides with the dry season mix.
  • In a large non-stick skillet heat up olive oil on medium high heat.
  • Brown all sides of beef cubes; a few batches at a time (don't over crowd). Add more oil and reduce the heat if you need to. Once browned, place beef into crock pot. (Browning seals up the moisture in the meat so you get a more tender and flavorful result).
  • Nestle the onion down into the middle of the beef cubes; add the garlic cloves, 2 cans of diced green chilies and pour the 2 cans of enchilada sauce over the top.
  • Cover Crock pot with lid and cook on low for 7-8 hours or on high for 3-4 hours until meat is tender and easy to shred with a fork.
  • Once meat is tender turn off the crock pot. Remove meat with slotted spoon into a large bowl or onto a platter; set aside.
  • Take out onion and garlic. Cut the onion in half and place, along with the garlic, into a Cuisinart or blender. Add 1 cup of the crock pot liquid to the blender as well, and blend until onion pieces are dissolved into sauce.
  • Pour the rest of the crock pot sauce into a large sauce pan, add the onion-garlic sauce blend to the sauce pan as well. Bring the sauce to a boil and then simmer, until the red sauce is reduced a little and thickened.
  • Shred the beef with 2 forks and place back into crock pot except for 1/2 cup of the beef shreds; set aside.
  • Add to the crock pot about 1 cup of red sauce or just enough sauce to moisten the shredded beef.
  • Add the reserved 1/2 cup of beef into the red sauce in the sauce pan-this is your smothered sauce.
  • Cook tortillas on a cast iron comal or pancake griddle; keep the cooked tortillas inside a paper towel lined tortilla warmer or wrap the cooked tortillas in clean kitchen towels and then tinfoil around the towels to keep warm.
  • Heat refried beans in a microwave safe bowl with a paper towel on top; when done, cover to keep warm.
  • Assemble your burritos by placing the refried beans in the middle of the tortilla then add the shredded beef on top of the beans. Roll your burrito, ladle the smothered sauce on top and sprinkle with cheese. Place under broiler to melt the cheese (only if you have an oven proof plate) or heat in the microwave until cheese is melted.
  •   Enjoy with tortilla chips, guacamole, sour cream and salsa.

    Saturday, August 11, 2012

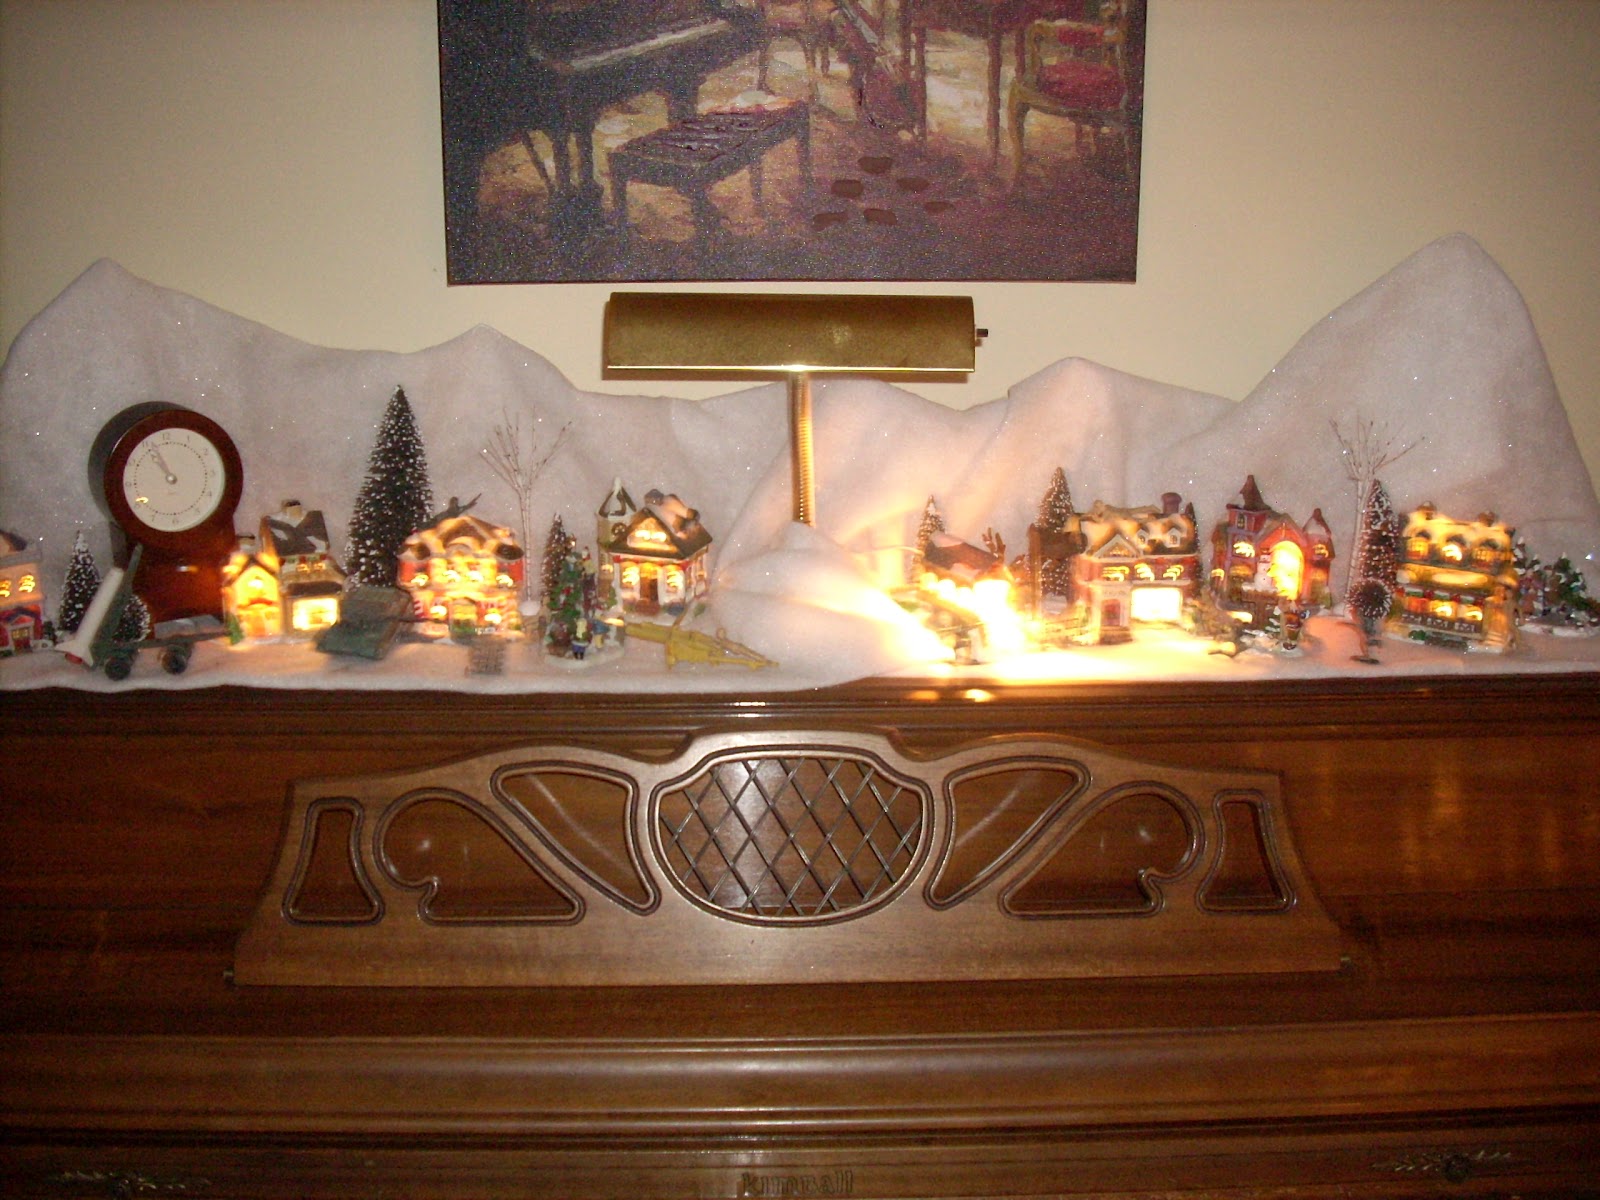
    Christmas Village Mountain Backdrop


     Make a snowy mountain back drop for your Christmas village by using wire hangers. I bent the hangers into different shapes with the hook as a stabilizer so it doesn't tip over. Then I draped a silver-speckled, white matting cloth (you can find at Walmart after Thanksgiving) over the bent hangers and then arranged my Christmas village on top.


    It took me 2 weeks to notice that my son had put his green army men along with their tanks and weapons in my Christmas village display.  Peace on earth, good will toward men?--Don't you just love boys!! 

    Fettuccine Alfredo with toasted pinenuts


    My family dubbed this “Christmas Fetticine”.  At the table before serving I grate the Parmigiano-Reggiano over the top. The first time I did this one of my kids started singing “Let it snow, let it snow, let it snow” and now it’s became a tradition. 

    Ingredients:
    1 small bag of pine nuts (1/2 cup)
    1 lb box of Fettuccine dry pasta
    1 pint of Heavy Cream (2 cups)
    2 cloves of garlic (peeled and smashed with side of large knife
    1/2 cup (1 stick) unsalted butter
    1 cup (plus more for garnish) freshly grated Parmigiano-Reggiano (parmesan cheese wedge-you can find it in the Deli department).
    Freshly cracked black pepper
    Freshly grated nutmeg
    Chopped fresh flat-leaf parsley (1 hand full)

    Directions: *(try to time the cooking of the pasta with the alfredo cooking time, so they are done at the same time)
    • Toast your pine nuts until golden in a non-stick pan stirring them as they toast on the stove or put them on a cooking sheet and place in oven under the broiler (watch it so they don't burn!).
    • Cook Fettuccine in plenty of boiling, salted water until pasta is al dente, (about 12 minutes). Drain and set aside on a warmed serving dish or platter (you can warm serving dish in the oven on a low temp or in the dish washer on the drying/heat setting).
    • *While pasta is boiling, heat heavy cream and smashed garlic cloves over medium heat in a deep sauce pan. Add butter and whisk gently to melt. Fish out garlic cloves with a slotted spoon and discard. Sprinkle in the 1 cup of cheese and stir to incorporate. Keep stirring, don't let it come to a boil or you'll burn the bottom, so watch, stir frequently and reduce heat if needed. Cook until it thickens (or coats the back of a spoon), add more parmesan cheese if its not thick enough. 
    • Season the Alfredo sauce with freshly cracked black pepper and add a few pinches of freshly grated nutmeg.
    • Pour the sauce over the fettuccine and add the pine nuts and the parsley; gently toss the pasta to coat in the sauce.
    • Top with more grated cheese. Serve immediately.

    Wednesday, August 8, 2012

    "Spook" your home pics for Halloween

    Decorate your home pictures for Halloween with construction paper cut-outs. Mount the cut-outs on the picture frame's glass with sticky-tac. 

    Thursday, August 2, 2012

    Chili Cornbread Pie Shortcut


    Chili Cornbread Pie Shortcut

    When you don't have time to make chili from scratch. Just open a can of your favorite chili and top it with a corn bread muffin mix, throw it in the oven and Bam! dinner is done.


    This recipe serves 10

    You'll need:

    5 cans (15 oz. each) of your favorite canned chili.
    2 cups of frozen corn.
    2-(7 or 8.5) dry corn bread muffin mix.
    2 small cans mild diced green chilies, drained (opt).
    2 cups shredded cheese (cheddar or monterrey jack).
    Sliced avocado, salsa and sour cream-for garnish(opt).


    Directions:

    • Preheat oven to 400  F. Non-stick spray a 13x9 inch baking dish.
    • Add chili and corn to baking dish; stir to distribute the corn evenly into the chili.
    • In a separate bowl, follow the directions on the back of the corn muffin mixes to make the batter.
    • Stir drained green chilies and the shredded cheese into the wet, corn muffin batter; top the chili with the corn batter and spread evenly on top.
    • Bake for 15 to 20 minutes or until lightly browned on top. Let stand for 10 minutes before serving.
    • Garnish with avocado slices, salsa and sour cream.                             

    Halloween Pumpkin Lighted Topiaries

    Instructions below are for one 3-tier topiary like the one above, pictured on the left.
    I stack, skewer and display my 3 pumpkins whole and un-carved from the 1st of October until the 30th. Then on Halloween day I follow the instructions below and place them out in time for Halloween night.

    Pumpkin Lighted Topiaries

    You'll Need: 
     
    1. Large pedestal urn (place a large lid from a storage bucket in urn top so large pumpkin sits flat and even in urn). Or large planter pot (fill planter pot with dirt or place a smaller size planter pot upside down inside larger pot to prop pumpkin tier on; fill in gap with dried moss around bottom pumpkin.
    2. 3 pumpkins; large, medium and small.
    3. Carving knife and large spoon or other tool for cleaning out pumpkins.
    4. Black permanent marker.
    5. Carving tool or large phillips screw driver for making small, round "star" holes for light to shine through.
    6. Battery operated pumpkin lights; 1 if its a large light, 2 or three if smaller lights, or use a small bunch of soft white or bright white Christmas lights.
    7. Extension cord (if using Christmas lights)
    8. Long metal skewer and hammer.
    Instructions:
    • Remove stem from large pumpkin; carve out an opening at the top (discard top carving remnant). Clean out the inside of large pumpkin.
    • Carve out an opening at the top and bottom of medium pumpkin (discard remnants). Clean out the inside of medium pumpkin.
    • Leave stem on small pumpkin; carve out opening on the bottom (discard remnant) and clean out the inside.
    • Place medium pumpkin on top of large. Draw and fill in with a black marker, a tree that starts at the large pumpkin and extends up to the middle pumpkin.
    • Take medium pumpkin off of large pumpkin; poke or carve holes in both medium and large pumpkins (for the "stars") all around tree drawing. 
    • If using Christmas lights; carve out hole near bottom of large pumpkin's rear facing side, large enough for Christmas light plug to fit through. Put Christmas lights in large pumpkin and pull plug through carved out hole. Place large pumpkin with tree drawing facing forward onto urn or planter pot. Attach Christmas light's plug into extension cord. Plug extension cord into outdoor, electrical outlet.
  • If using battery operated pumpkin lights, turn them on and place inside large pumpkin; place large pumpkin with tree drawing facing forward onto urn or planter pot.
  • Place medium pumpkin on top of large pumpkin, lining up the tree drawing.
  • Place small pumpkin with crescent moon facing forward on top of medium pumpkin.
  • Secure with metal skewer by tapping the top of skewer with hammer, down the back of all three pumpkins.